From the stand point of the shop owner they must always try to portray a positive image for their business. For the purpose of this blog post, we will look at services provided by the "dirty" sections of the automotive industry, these are body shops, mechanics shops, machine shops and so on.
What I call front line professionalism doesn't have anything to do with the people in the shop but it does have alot to do with the attitudes and personalities of the people running and or working in the shop. What I mean by this is for example is a production body shop. When a customer comes to the shop and sees that the exterior of the building is even in slight disrepair it may leave a bad impression on the customer. So, lets go back for a second, we will use a shop which is pristine on the outside, rather impressive looking. The customer enters the shop and it has dirty floors, there are parts stacked disorganised and in disarray, the lunch room is trashed it may leave the impression that the shop is mismanaged. That customer may refuse to get work done there, however if they do decide to get work done there, they may tell their friends that the shop was disorganised and dirty and it may create opinions about that shop by people that have never stepped foot in the shop, even if the shop is the best shop in a radius of 100 miles the image being portrayed may cause people to look away.
Looking ahead, we will move onto what I call secondary front line professionalism and this has to do with the image of the shop owner and the attitudes of the people in the shop.
->If a shop owner travels around town wearing dirty, or even out of style clothes it can leave an image that the shop is struggling and may turn people off of the business out of worry for their ,name object being serviced may be trapped there or half assed due to the owners image. Don't be the stinky kid in class!!!
-> One of the hardest parts of the service industry is pleasing the customer. Now, you cannot please everyone but a shop owner must please most people who come into the shop for the repeat business or to get the word spread on the work performed. Even tho most annoying and demanding customers have money to pay you with and may speak highly of your work, even if it doesn't seem so when they come in.
-> Social media- Social media may be a great tool for promoting your business, but using it incorrectly may lead to negative implications. Making inappropriate post may not be well recepted by some customers. Although they may be humorous for the poster, not all people are that open minded and find the material offensive.
Image is everything, Keep your shop clean, look and be professional and be nice to everyone. Represent yourself well at trade shows and make appearances at events in a professional manner.
Tuesday, 16 April 2013
Metal Work, Panel shaping and Smashing things into Shape
In any trade there are different ways of doing things. Most trades people consider their way as being the best, in some cases to the closed minded, the only way to do things is their way. Personally, I try to keep an open mind. I will try things a few times to get the results I want.
This post is about trying things in a different way. I have never liked the fender skirts on a 49-54 Chev, they don't reach the bottom of the quarter and they are plain and bland. I had attempted to weld a quarter inch rod to the bottom in an effort to flare them out and form sheet metal to them. It looked like garbage and from side to side the didn't match, they looked like the guy who shaves on side burn at a different angle than the other, RIDICULOUS!
 If you look closely at the above picture you will see the fender skirt ends an inch above the bottom of the quarter, BLAH!
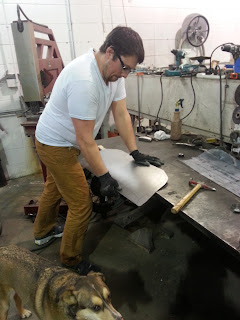
 Above you can see the fender skirt I messed around with. I got the basic shape that I wanted but I didn't like the results so I went back to the drawing board. By laying a sheet of plastic, in this case vapour barrier, over the fender skirt I traced the outline. I then drew a grid on it and measured the profile using a profile gauge. This will help us later to accurately form the shape with the planishing hammer and tweak it with a hammer and dolly.
 After I have my pattern, I cut it out and place magnet to hold it to the new sheet metal. The bottom section is a reverse curve so it gets market with a series of dots by scribing the metal along the line in the plastic and then tracing the scribed dots with a marker. The plastic sheet has the profile numbers marked on it as a reference.
I roughly trimmed the outside of the lines on the new panel. I went to work putting slight bends into the panel by pressing the long and the short way to form a rough and basic shape into the panel.

After the rough hand shaping I put a 36 radius die in the planishing hammer. Basically what the planishing hammer does is actuates a flat die into the sheet metal beating it against a radiused die of the shape desired. Its like using a hammer and dolly but works much faster.

Its hard to see in this picture but there is a slight crown in this panel now, which matches the fender skirt.

I then put a 1.5 inch radius die in the planishing hammer to rough out the compund curve for the flare. I held the panel to the table with my elbow and pressed the small skinny side of a universal dolly into the bottom of the conpuond curve and work slowly from side to side rolling the lip up.

To finish the edge and roll it up, I don't show it but I placed my pattern over top and marked where the lip needed to be rolled. from the bottom I placed a spoon dolly and worked slowly again working from side to side until the edge was almost completely rolled over.

This post is about trying things in a different way. I have never liked the fender skirts on a 49-54 Chev, they don't reach the bottom of the quarter and they are plain and bland. I had attempted to weld a quarter inch rod to the bottom in an effort to flare them out and form sheet metal to them. It looked like garbage and from side to side the didn't match, they looked like the guy who shaves on side burn at a different angle than the other, RIDICULOUS!


After the rough hand shaping I put a 36 radius die in the planishing hammer. Basically what the planishing hammer does is actuates a flat die into the sheet metal beating it against a radiused die of the shape desired. Its like using a hammer and dolly but works much faster.

Its hard to see in this picture but there is a slight crown in this panel now, which matches the fender skirt.

I then put a 1.5 inch radius die in the planishing hammer to rough out the compund curve for the flare. I held the panel to the table with my elbow and pressed the small skinny side of a universal dolly into the bottom of the conpuond curve and work slowly from side to side rolling the lip up.

To finish the edge and roll it up, I don't show it but I placed my pattern over top and marked where the lip needed to be rolled. from the bottom I placed a spoon dolly and worked slowly again working from side to side until the edge was almost completely rolled over.

I am pretty happy with how they have turned out so far. The next step will be another blog post, which I will put the old ones on the car and cut out the nasty stuff. I will then trim these new skins I made to fit to the skirts and weld them in place.
Mother nature, rust and panel shaping.
Cars that are lucky enough and survive long enough to become classics also come with classic problems. Worn components, rust and obsolete or unattainable parts. The cars that are lucky enough to get restored don't always get the best attention, be it the skills of the restorer, or a half assed effort to hastily try and get the car on the road. (Haste makes waste!!!) I appreciate that the vehicle is on the road, but personally poor craftsmanship drives me crazy and there is no need for it if the proper effort is applied. Now, not everyone in the hobby has the skill to do concourse work, I personally don't claim to know everything or to be the best, but what I hope to achieve while writing this blog is to show how I, or my friends who help/teach me, do things.
If you remember back to an earlier post my good buddy Chad helped me replace the outer rocker and lower front quarter of the drivers side. We used sheet metal ordered from National Chevy Association. With a little bit of hammer and dolly manipulation they fit quite well (mostly it was shipping damage that needed repair)
The piece below this text is the rear inner rocker on the passenger side. It it not available from restoration suppliers, it is a piece that needs to be made.

You can see that this piece is almost non-existent from the rust. This is not a difficult piece to make, but we needed to improvise a little bit. Here's how we did it with minimal tools.

The entire rocker, inner rocker inner quarte and outer lower quarter are removed from the car so all rusty pieces are gone. The areas in the above picture are all cleaned prior to welding.
What we don't show is the cardboard template we used to get the profile of the rusted out inner quarter 2 pictures above. This template was then transferred to the 18 GA sheet metal, which was clamped to the table and flanged down using duck bill vice grips. Below you can see Chad straightening the flange with a little bit of hammer and dolly work.


2 inch tape was used to layout the edge of where the flange is, the reason this is done is so that a little bit of extra metal is left over when we are done, it also gives a little bit of a buffer in case the template is not exactly perfect.

The template we made showed where the bend should start, a tear drop hammer and a couch cushion were used to manipulate the metal into a general shape that we wanted.

To really manipulate the shape. the telepost in the basement was used to radius along the line we made with the hammer.

With slight hammer and dolly work, the radius was finished and the flange was banged into the bottom edge.This is then fit to the car to see if it matches the new quarter.

first, the inner was spot welded to the floor it was coated with a copper rich weld through primer to prevent corrosion in the future. The reason this is done is so that we have a guide to go off of, before it was removed measurements were taken so the bottom flange is in the factory location.

The outer rocker was drilled with 10 holes on each flange (top and bottom) as welll as on the front and the back section (2 holes each) to attach to the factory spot weld areas.

The outer rocker was also treated to some weld through primer

Rocker now welded into place. Prior to this picture the door was installed and checked for squareness before the rocker was final welded. After this point the lower front quarter is tack welded in place to use as a guide to weld the inner quarter to.

A picture prior to cutting out all the rust and installing the new quarters and rockers.

.
Here is the piece we made earlier in place before the floor braces were welded in, it fit well and a minimum of hammer and dolly work were needed after installation to make it fit. It was then spot welded, using 1/4 inch holes to attach to where the original floor was. The inner rockers from this piece forward to the inners we made earlier by flanging another flat straight piece over the edge of the table, then hammer and dollied straight drilled for spot welds and installed. In retrospect, we should have made the rear inner quarter 5 inches longer, because 5 inches is all we needed, then it would have been 2 pieces instead of 3.

Here Chad is finish welding the panels in place.
It doesnt look like much work, now that I go back and look at my pictures, however, this little project took 2 guys, 2 days at 10 hours per day, so around 20 hours each equalling 40 hours. Chad and I dont mess around too much, thankfully Chad has a good work ethic and can keep me motivated and working the whole day. The results show. All that is left when we shut it down on sunday was to weld the floor braces to the inner rocker and cut off the excess flange to mach up with the factory pinch weld spec, and to grind down the weld on the front quarter and the quarter and rocker escapade is DONE-ZO!!!!!!
Wednesday, 3 April 2013
Creativity and a Mans Obsession
Creativity, it cannot be taught. More precisely, it cannot be learned. Its something a person is born with, it could be a psychological response from our instinctive mind on survival. Or it could be that some people have a vibrant mind wanting to get out and show what the mind can be capable of.
I consider myself to be creative. I have learnt to become very competent in my trades, some would say an expert and I now hold an office job which being as versed in my trades as I have become has brought me to. When I was a floor level worker I always felt as if I needed to do something to satisfy my mind, do something creative, I NEEDED to get it out of my head as soon as I could and I couldn't wait to get home to draw something pulsating from my mind. More often than not I would have to build what was on my mind. Perhaps this is a personality flaw know as an obsession. I admit, I am obsessed with building things which are unique and original. How this started is by wanting to own things no one else had.
Others have this too. I was approached by a friend of mine who owns a Hot Rod shop who is building a Volkswagon bus to commision some work to me. Now this isn't a drab, boring restoration. Not that I dont like restorations, I respect the work that has been done on them, but I really respect something unique and well crafted, well thought out and planned. This hippy wagon is getting a Porsche engine and transmission, yeah baby, LETS DO IT! The owner has some kinda of vision an I LIKE IT!
The first order of business was to build some custom valve covers for the 6 cylinder dual overhead cam engine. There a 4 Valve covers in total. The owner wanted something no one else has so we sat down, talked numbers and got to work. Unfortunately I didn't get any pictures of the valve covers in production, but I did get one of the finished product.

I will admit, these were alot of work, was it worth it? I think so. You cannot just buy something like this and its exactly what the owner had wanted. What drives people to do or build such crazy and insane things? Status? I really don't think thats the answer, how many people actually care if someone has custom made valve covers on their Porsche engine? NOT MANY. In fact most "normal" people could care less. But we are not normal people. We are creative people and the owner sure does care if he has custom made valve covers, in fact I care if he has custom made valve covers. This kind of thing exacerbates my obsessiveness and gets me really excited and the ideas flow, thus leading us to the next part of this entry.
The timing chain covers on this thing were hideous, I suppose as hideous as the perfectionist German engineer can perform (which means every single part is though about functionally and as aestetically as possible). I thought we could improve things. When the engine cover is lifted on this beast the engine is in plain sight. Who wants plain timing covers on their engine? I am sure that purist Volkswagon and porsche people are going to HATE me after the post, but myself, my buddy and the owner want something different.


I consider myself to be creative. I have learnt to become very competent in my trades, some would say an expert and I now hold an office job which being as versed in my trades as I have become has brought me to. When I was a floor level worker I always felt as if I needed to do something to satisfy my mind, do something creative, I NEEDED to get it out of my head as soon as I could and I couldn't wait to get home to draw something pulsating from my mind. More often than not I would have to build what was on my mind. Perhaps this is a personality flaw know as an obsession. I admit, I am obsessed with building things which are unique and original. How this started is by wanting to own things no one else had.
Others have this too. I was approached by a friend of mine who owns a Hot Rod shop who is building a Volkswagon bus to commision some work to me. Now this isn't a drab, boring restoration. Not that I dont like restorations, I respect the work that has been done on them, but I really respect something unique and well crafted, well thought out and planned. This hippy wagon is getting a Porsche engine and transmission, yeah baby, LETS DO IT! The owner has some kinda of vision an I LIKE IT!
The first order of business was to build some custom valve covers for the 6 cylinder dual overhead cam engine. There a 4 Valve covers in total. The owner wanted something no one else has so we sat down, talked numbers and got to work. Unfortunately I didn't get any pictures of the valve covers in production, but I did get one of the finished product.
I will admit, these were alot of work, was it worth it? I think so. You cannot just buy something like this and its exactly what the owner had wanted. What drives people to do or build such crazy and insane things? Status? I really don't think thats the answer, how many people actually care if someone has custom made valve covers on their Porsche engine? NOT MANY. In fact most "normal" people could care less. But we are not normal people. We are creative people and the owner sure does care if he has custom made valve covers, in fact I care if he has custom made valve covers. This kind of thing exacerbates my obsessiveness and gets me really excited and the ideas flow, thus leading us to the next part of this entry.
The timing chain covers on this thing were hideous, I suppose as hideous as the perfectionist German engineer can perform (which means every single part is though about functionally and as aestetically as possible). I thought we could improve things. When the engine cover is lifted on this beast the engine is in plain sight. Who wants plain timing covers on their engine? I am sure that purist Volkswagon and porsche people are going to HATE me after the post, but myself, my buddy and the owner want something different.
Here are the timing chain covers laid out and center punched. The patterns were made by clamping the originals over top and using transfer punches to align the bolt holes. If you don't own a set of transfer punches, go out and buy a set as soon as you can. If you don't know what they are FIND OUT!
This is a shot of right after I cut the timing covers. I admit, I used a bandsaw and cleaned up the edges with the milling machine and a die grinder where appropriate.
Someone had mentioned to me, "why not go and get these water jet cut?"
Well, for starters, both sides are different, so 2 different pieces need to be programmed into the waterjet. Something else I took into consideration is, how many of these do I need to get produced, 1 pair. The most major factor is finances. Sure for a smokin $400 I could drop off my sheet of T-6 aircraft grade wonder alloy and get the outsides of these thing cut by the most modern high pressure water cutting computer controlled magic box, but, thats money I would have to add a percentage onto that number for the customer for covering transport, my time talking to the waterjet dude and so on. However, it took me 4 hours start to finish to cut these out, in house, start to finish and I did it myself, no time wasted.
Now, as you can see from this picture I went to the milling machine, clamped this thing into the machine tighter than a depressed fat girl holding onto a doughnut, indexed it and did the 'ol drill, countersink repeat routine.
In this picture, you can tell I spent alot of time measuring and laying out. Porsches use O-ring style gasket which which sit in a channel and are far superior to cork, paper or other types of gaskets that are between surfaces. When the O-ring style gaskets get compressed they fill the slight clearance engineered into the cahnnel creating maximum sealing capacity. In the picture you can see the 1 inch diameter hole and the channel running parallel with the engine.
When someone becomes proficient with something, that person, be it an artist, motorcyclist, race car driver or tradesperson, they get into a state of being in tune with what they are doing its something that cannot be explained, it can only be experienced. When I machined the O-ring grooves I set the machine to a straight cut on the long side, for all the curves and the other part I free handed them. To me this seems natural, perhaps its muscle memory, perhaps it just me being in tune with the machine and using it as an extesion of my body. Perhapes its all in my head.
Here are the almost finished products. If you look closely you can see the 1 inch hole with the oil groove run across the inside. So far into this project, I felt pretty good about what has been accomplished. When I thought about it, something was really bugging me. I had to take a few days off from these and really think about what I needed to do to really make these high quality and outstanding.
What I had came up was to chamfer the edges and put a wicked polish onto these. Now we were ready to install them.
So far so good, I apologize about the quality of this picture, this is still in the project stage and once it is installed in the frame I will capture a better shot and add it to a later post.
In retrospect on this project, what is it that made it so special? Well for starters, I dont know of another engine like this, so it makes it special to me. I also enjoyed the look and the reaction of the customer when he came and looked a the pieces I made. This brings me a great deal of satisfaction and a feeling like no other.
Monday, 1 April 2013
Everyone Hates an Edsel
Within my car club there has been a few Edsels. I personally like them, prompting me to purchase one off my car club brother. I have no idea how many times I have heard people make comments like, "who the F*** would build an Edsel," or the more famous, "Wasn't that the worst car ever built?" People hate Edsels.
I like Edsels, more correctly I like custom cars and I have a soft spot in my heart for late 50s cars done up in the likes of Larry Watson, Darryl Starbird, Dean Jefferies and Gene Winfield. Some people refer to these cars as Bellflower cars, for the reason of being predominantly from the Bellflower California area AKA Kustomland circa 1962 to around 1966. Although to get quite technical in different areas there were different styles and even year to year there were subtle differences. Most people refer to these cars as early lowriders.
My plan upon purchasing the Edsel was to finish what I had started with my car club brothers. What we had done was body work the roof, prime it and paint it silver. A few weeks later we sprayed silver boat flake using a 2mm tip on a primer gun and cleared it. We sanded it down and cleared it again to remove the rough finish and a few weeks later we cracked out the lace and red candy. First we panelled off the roof and ran a pinstripe down the side with a little triangle on the C-pillar. We layed rose printed lace over the roof and in the triangle on the C-pillar and sprayed 3 coats of candy pulled the lace and did anothe 2 coats and then pulled the pinstriping tape we used for the triangle and the panels. We sprayed another 2 coats, cleared it and cut polished it.


Now it came time to try some flames, so we decided to try iy on the one painted fender. We only tried one fender because if we didnt like the way it looked we could wet sand it and spray it white again (BORING)
 We masked off some 60's style flames, we really liked where this was heading.

 Out came the airbrush (yes they had airbrushes back in the old days) and an orange pearl was dusted around the edges of the masking and when it was pulled the excitement ensued. when we stood back and looked at the car, the way it was panelled off would have made the car look strangely disproportionate. My friend Lee looked at it and suggested that the car should be panelled off following the side trim. Out came the bucket of water and the wet sanding paper and the panel was re-masked down the side.
 This picture is just before the red pearl was added to the edges.
 We would stand back everytime we did something and see if the flow was correct. This is a picture from later on in the project, but it goes to show how the project started to take off. Everyone adding input yet keeping on track with the vision we had.
 This picture shows how we panelled off the hood, there was alot of negative space in the panels after it was fade panelled.
 The solution was to dust a dark grey metalflake to add some contrast the the white and reds on the car.
 The flames were added to the back to take up some of the "open space" there. The same lace treatment was added to the center of the trunk. Eventually 1/4 inch red lines were also added which you will see in later pictures.
 Attention to detail is a big deal to me. My friend Chad wanted to help out with the car so he fade painted the steering wheel while we were tending to the interior of the car. I couldnt be happier with the results of his experiment.
 Note the faux polar bear hide added to the dash, it was also added to the rear package tray as well.

 Fitting up the Bellflower tips


 Note the 1/4 inch red lines added to the trunk lid.


Im 31, My friends are all around my age. Most people are really surprised that a group of kids are into cars my grandpa would have built. This style of car is a part of history, its not that I am trying to live in the past, this is something you dont see at the local A&W on cruise night, nor is this car period perfect by any means, the giant 400HP 361 was long gone before Johnny purchsed this car, it came with a mustang 302 (a little anemic at times for this giant hulk) However for me this style of car has the right mix of class and badass.
I suppose some people do, afterall, like the crappiest car Ford ever made.
I like Edsels, more correctly I like custom cars and I have a soft spot in my heart for late 50s cars done up in the likes of Larry Watson, Darryl Starbird, Dean Jefferies and Gene Winfield. Some people refer to these cars as Bellflower cars, for the reason of being predominantly from the Bellflower California area AKA Kustomland circa 1962 to around 1966. Although to get quite technical in different areas there were different styles and even year to year there were subtle differences. Most people refer to these cars as early lowriders.
My plan upon purchasing the Edsel was to finish what I had started with my car club brothers. What we had done was body work the roof, prime it and paint it silver. A few weeks later we sprayed silver boat flake using a 2mm tip on a primer gun and cleared it. We sanded it down and cleared it again to remove the rough finish and a few weeks later we cracked out the lace and red candy. First we panelled off the roof and ran a pinstripe down the side with a little triangle on the C-pillar. We layed rose printed lace over the roof and in the triangle on the C-pillar and sprayed 3 coats of candy pulled the lace and did anothe 2 coats and then pulled the pinstriping tape we used for the triangle and the panels. We sprayed another 2 coats, cleared it and cut polished it.
Kind of a crappy picture but gives an idea on the roof.
Mechanically the car was brilliant. Everything had been meticulously taken care of by Johnny, the previous owner. When I purchased the car from him I promised that I would finish the car to the standard he wanted to finish it with. The plan was to complete the car before the 2013 World Of Wheels in Calgary. What I started doing right away was researching the early lowrider style. I studied and made drawings and clipped out magazine articles and printed a forest of ideas. Once I decided on what I wanted to do, when it came time to p[aint the car I taped them to a table near the car for inspiration. I wanted to do a panel job like Larry watson with Gene Winfield pearl fades and FLAMES everywhere. What we first started with was a bright white with diamond pearl in it. We painted one fender with fades, copper with a red pearl faded on the edges.
Now it came time to try some flames, so we decided to try iy on the one painted fender. We only tried one fender because if we didnt like the way it looked we could wet sand it and spray it white again (BORING)
we continued masking untill the entire outside of the flames were masked and then layed paper around the edges.
A slightly grainy picture after the car was cleared
A picture of the car at the World of wheels Calgary Alberta 2013
Note how subtle the lace work on the hood is.
I am really proud of how this car came together. The World Of Wheels show is really a great show. I spoke to lots of very nice people and we made quite the accomplishments. We came in third place in our class and were also awarded with the mayors pick.
Im 31, My friends are all around my age. Most people are really surprised that a group of kids are into cars my grandpa would have built. This style of car is a part of history, its not that I am trying to live in the past, this is something you dont see at the local A&W on cruise night, nor is this car period perfect by any means, the giant 400HP 361 was long gone before Johnny purchsed this car, it came with a mustang 302 (a little anemic at times for this giant hulk) However for me this style of car has the right mix of class and badass.
I suppose some people do, afterall, like the crappiest car Ford ever made.
Subscribe to:
Posts (Atom)